
CSS Box Model
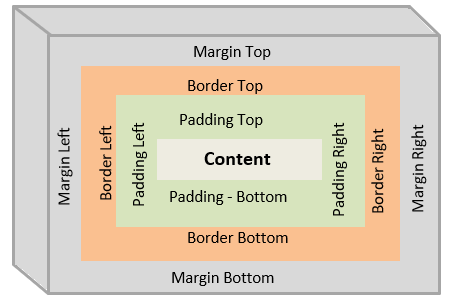
HTML page is a collection of HTML elements (ex: P, DIV, H1). Each element is considered as a box. Each box has four areas/layers.
- First area is a content area. Content can be text, image, etc.,
- Around content area, padding area (space around the HTML element content) is applied.
- Around padding area, border area is applied.
- Around border area, margin area (space around the HTML element border) is applied.
Each element’s content, padding, border and margin properties can be adjusted. All the time, padding, border and margin properties are applied to each element implicitly or explicitly.
HTML elements are categorized as block-level elements and inline elements.
What is Block-level element?
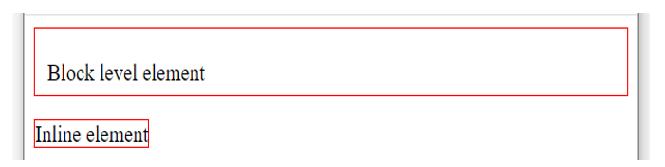
Block-level elements by default start on a new line and occupies full page width. Width and height properties are respected to block-level elements. Using display property, block-level elements can be converted to block-inline, inline, etc., elements, Few block-level elements are <div>, <p>, <pre>, <h1>,<h2>,<ul>,<ol>.
What is inline element?
Inline elements by default occupies only required width based on content size. Width and height properties are not respected/applicable to inline elements. Using display property, inline elements can be converted to block, block-inline, etc., elements. Few inline elements are <a>, <span>, <img>, <i>.
Block-level vs Inline elements.
- Block-level elements by default start on a new line and occupies full page width. But, Inline elements by default occupies only required width based on content size.
- Width and height properties are applicable to block-level element but not to inline elements.
- Inline elements can be placed inside the block-level element, but block-level elements can not be placed inside the inline element.
- All padding and margin properties affect block-level elements.
-
Following padding and margin properties don’t affect inline elements.
- padding-top
- padding-bottom
- margin-top
- margin-bottom
Remaining padding and margin properties only affects inline elements.
Following example shows box model (on right side top) diagram for left side specified code.

In the above example,
- Top left section has CSS properties of the P element.
- Bottom left section has HTML code of the P element.
- Top right section shows, Box model diagram of the P element (copied from chrome browser’s developer tool section).
- Bottom right section shows, actual output of this HTML code.
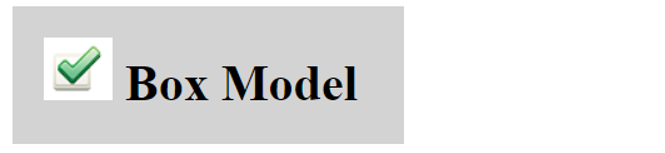
Content
Content is the first area in the box model. Content denotes text, image, etc., inside the HTML elements.
h1 {
    background-color:lightgray;
   }
<body>
<h1><img src="task-ok.png" /> Box Model</h1>
</body>

In the above example,
- Content part has an image and text.
- Background color has been applied.
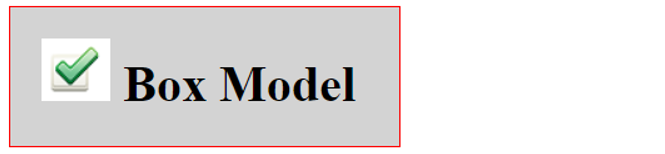
Padding
Padding is the second area around the content area. Padding is a space around the HTML element content. Padding can set all sides, or one or more sides of the element.
Padding property shorthand syntax
padding: <padding top value> || <padding right value> || <padding bottom value> || <padding left value>
Padding property longhand syntax
padding-<top || right || bottom || left>:<value>
h1 {
    background-color:lightgray;
    padding:20px;
   }
In the above example,
- Around content, padding space 20px is added to all four sides.
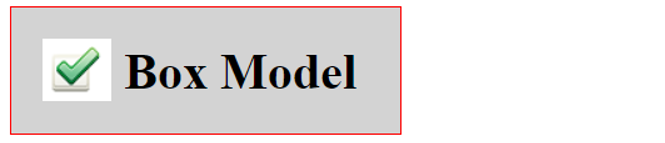
Border
Border is the third area around the padding area. Border property is used to style the border of the element. Border property sets the value of border-width, border-style and border-color.
Border property shorthand syntax
border: [<border width>] <border style - required> [<border color>]
System takes default values for border width and border color when no values specified.
Border property longhand syntax(core)
border-<width || style || color>:<value>
h1 {
    background-color:lightgray;
    padding:20px;
    border:1px solid red;
    }
In the above example,
- With padding, border width 1px, border style Solid and border color Red are applied.
Margin
Margin is the fourth area around the border area. Margin is a space around the HTML element border. Margin can set all sides, or one or more sides of the element.
Note:
1. There is no margin color property.
2. By default, when parent element has background color then the same color applies to child element margin also else no background color applies.
Margin property shorthand syntax
margin: <margin top value> || < margin right value> || < margin bottom value> || < margin left value>
Margin property longhand syntax
margin-<top || right || bottom || left>:<value>
h1 {
    background-color:lightgray;
    padding:20px;
    border:1px solid red;
    }

img {
    margin-bottom:-8px;
    }
In the above example,
- With padding and border, margin bottom -8px is applied here. Margin property centered the image.
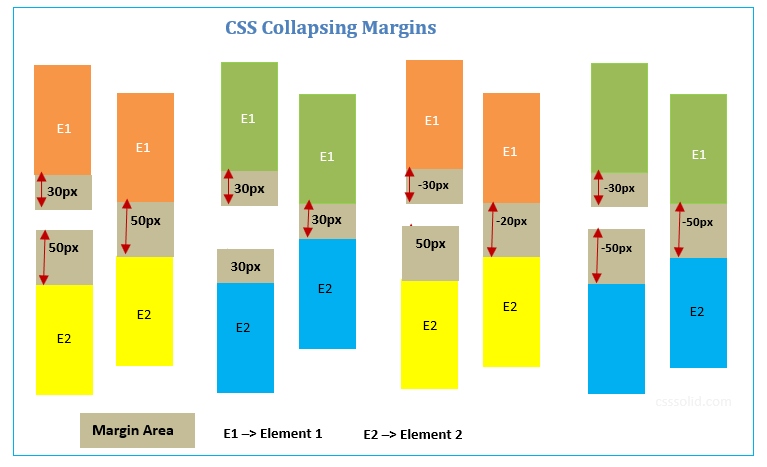
CSS Collapsing Margins
When vertical margins of two elements touch, margin collapse happens (both margins are not applied/honored as specified). Details are explained below.
- If one element vertical margin height is greater than other, greater vertical margin height is only applied (10px 20px -> 20px).
- If both vertical margin heights are same, one vertical margin height is only applied (10px, 10px -> 10px).
- If one element vertical margin height has positive value (ex: 30px) and another vertical margin height is negative value (ex: -10px) then addition of both values is (30px + (–10px) = 20px) applied.
- If both elements vertical margin heights are negative then greater negative vertical margin height is only applied (-10px, -20px -> -20px).
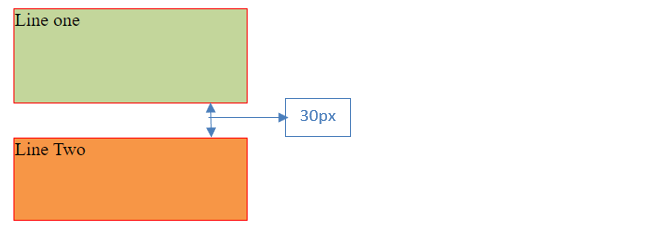
p {
    height:80px;
    margin-bottom:20px;
    border:1px red solid;
    background-color:#C3D69B;
    width:200px;
  }

 div {
    height:70px;
    margin-top:30px;
    border:1px red solid;
    background-color:#F79646;
    width:200px;
    }
<body>

    <p> Line one </p>
    <div> Line Two </div>

    </body>
In the above example, bottom margin 20px is applied to P element and top margin 30px is applied to DIV element. Since margin collapse happened, only margin 30px is applied in between P and DIV elements not 50px is applied.
CSS Auto Margin
Set margin property with value auto to block-level element helps to horizontally center the block-level element (not text inside the element).
p {
    width:600px;
    margin: 0 auto;
    background-color:orange;
  }
<body>
<p> Line one </p>
</body

In the above example,
- Here, margin top (margin-top:0;) and margin bottom (margin-bottom:0;) values set to 0. Margin right (margin-right:auto) and margin left (margin-left:auto) values set to auto.
- P element width is set to 600px. P element is centered based on remaining available space.
Note:
- Auto margin can be applied only to block-level elements (ex: <div>, <p>, <pre>, <h1>,<h2>,<ul>,<ol>) .
- Using margin:auto property, element can horizontally only centered.
- Auto margin property can not be applied to inline elements (ex: <a>, <span>, <img>, <i>).
- Auto margin property can not be applied to absolutely positioned block-level elements (ex: position:absolute;).
- Auto margin property can not be applied to float property with value left/right (ex: float:left;) applied block-level elements.
CSS Shorthand properties
CSS shorthand (ex: padding:20px) properties can be used instead of longhand version properties (ex: padding-top:20px, padding-right:20px, padding-bottom:20px, padding-left:20px).
/*CSS Shorthand version*/
    div {
    border:1px solid blue;
    padding:20px;
    }


    /*CSS Longhand version*/
    div {
    border-width:1px;
    border-style:solid;
    border-color:blue;
    padding-top:20px;
    padding-right:20px;
    padding-bottom:20px;
    padding-left:20px;
    }
1. Shorthand properties applicable order to the HTML element is Top, Right, Bottom and Left. If only one value is specified, then that value is applied to all four sides of the element.
p {
    padding:20px;
  }
In the above example, padding 20px is applied to all four sides of the element.
2. If two values are specified, then first value is applied to top and bottom sides of the element. Second value is applied to right and left sides of the element.
p {
    padding:20px 10px;
  }
In the above example, padding 20px is applied to Top and Bottom sides of the element. Padding 10px is applied to right and left sides of the element.
3. If three values are specified, then first value is applied to top side of the element. Second value is applied to right and left sides of the element. Third value is applied to bottom side of the element.
p {
    padding:20px 10px 5px;
  }
In the above example, padding 20px is applied to top side of the element. Padding 10px is applied to right and left sides of the element. Padding 5px is applied to bottom side of the element.
4. If four values are specified, then first value is applied to top side of the element. Second value is applied to right side of the element. Third value is applied to bottom side of the element. Fourth value is applied to left side of the element.
p {
    padding:20px 10px 5px 2px;
  }
In the above example, padding 20px is applied to top side of the element. Padding 10px is applied to right side of the element. Padding 5px is applied to bottom side of the element. Padding 2px is applied to left side of the element.

Style one or more sides of the element/box.
Apply padding/margin/border to one or more sides of the element is also possible. Every element has four sides, those are Top, Right, Bottom and Left.
<padding/border/margin>-<top/right/bottom/left>:<value>
h1 {
    background-color:lightgray;

    padding-bottom:10px;
    border-bottom:1px solid red;
    margin-bottom:5px;

    padding-top:30px;
    border-top:2px solid #0026ff;
    margin-top:20px;
    }
<h1>Box Model</h1>

In the above example, padding bottom(10px), border bottom (1px solid red) and margin bottom(5px) properties are applied to bottom side of the H1 element. Padding top(30px), border top(2px solid #0026ff) and margin top(20px) properties are applied to top side of the H1 element. No styles are applied to right and left side of the H1 element.
Calculate the element total width and height
Element is considered as a box and wrapped with multiple areas/layers (padding, border and margin). Using below example, let us see how to calculate an element height and width.
p {
    width:150px;
    height:60px;
    padding:40px;
    border:15px solid green;
    margin:20px;
    }

Above P element total height and width are calculated following way.
Total height = 60px (content height) + 40px (padding left) + 40px (padding right) + 15px (border left) + 15px (border right) + 20px (margin left) + 20px (margin right) = 210px.
Total width = 150px (content height) + 40px (padding top) + 40px (padding bottom) + 15px (border top) + 15px (border bottom) + 20px (margin top) + 20px (margin bottom) = 300px.
Total height of the above P element is 210px.
Total width of the above P element is 300px.
CSS Box Model Tips
-
If no padding is declared, then browser specific default padding is applied to an element. Default padding is mostly 0 or very negligible amount.
p { /*padding:10px;*/ border:1px solid red; margin:20px; } -
If no border style is specified, then no border style(border-style:none) is applied to an element by default.
p { padding:10px; /*border:1px solid red;*/ margin:20px; } -
If no margin is declared, then browser specific default margin is applied to an element. Default margin is mostly 0 or very negligible amount.
p { padding:10px; border:1px solid red; /*margin:20px;*/ } -
If no width is specified to block-level element, then block-level element takes 100% width by default.
p { border:1px solid red; /*width:150px;*/ } -
Block-level element and inline element take only required height space based on content size by default.

-
Inline element takes only required width based on content size.
-
Width and height properties are not applicable to inline elements but applicable to block-level elements.
p {
    border:1px solid red;
    width:150px;
    height:60px;
  }

span {
    border:1px solid red;
    width:150px;  /*Not applicable*/
    height:60px; /*Not applicable*/
  }
<p>Block level element</p> <span>Inline element</span>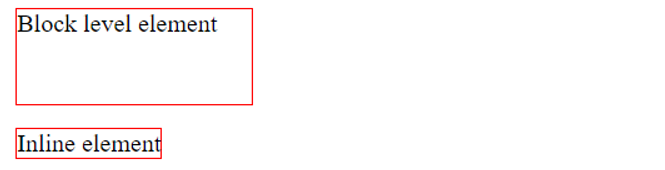
- There is no direct way to apply color to element’s margin space.
- Parent element background color is applied to child element margin space by default.
-
When apply a background color to a parent element then by default the same background color applies to child element’s content, padding and
margin also. Here when parent element has background color then child element margin also gets parent element color.
div {
    background-color:orange;
    height:100px;
    width:250px;
    border:1px solid red;
    margin:20px;
    }

 p {
    height:50px;
    width:100px;
    border:1px solid green;
    margin:20px;
    }
<div>DIV element <p>P element</p> </div>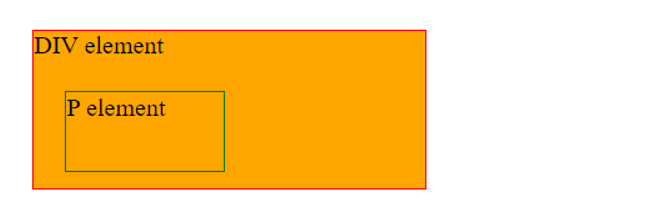
-
When apply a background color to an element, the same color also applies to padding space but not to margin space. Here margin is still transparent.
div {
    background-color:orange;
    height:50px;
    width:250px;
    border:1px solid red;
    margin:30px;
    }
<div> DIV element </div>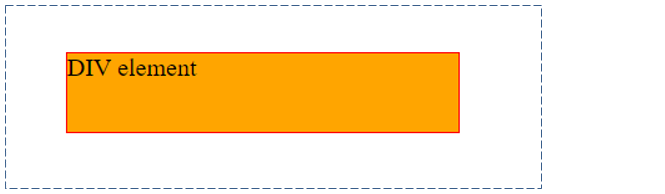
Note:Outside border is manually added to show the margin space area.
-
Longhand padding property syntax start with padding-xxx:<value>.
p { padding-top:20px; } -
Longhand margin property syntax start with margin-xxx:<value> (ex: margin-top:10px).
p { margin-top:10px; } -
Longhand border property syntax start with border-xxx:<value>.
p { border-color:red; } -
Better to use shorthand properties if possible.
p { border:1px solid green; } - Be aware of vertical margin collapse.
- Based on different browser (Chrome/IE/Firefox/etc.,), padding/border/margin outputs could be little different.
-
Users can go for available browser specific properties if need.
For Chrome, it starts with “-webkit-“
For IE, it starts with “-ms-“
For Firefox, it starts with “-moz-“
p {
    border-radius:74px 74px 74px 74px;
    -webkit-border-radius: 74px 74px 74px 74px;
    -moz-border-radius:74px 74px 74px 74px;
    -ms-overflow-style:scrollbar;
  }
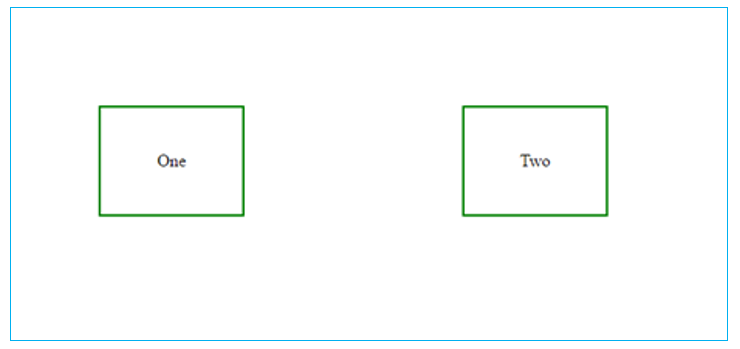
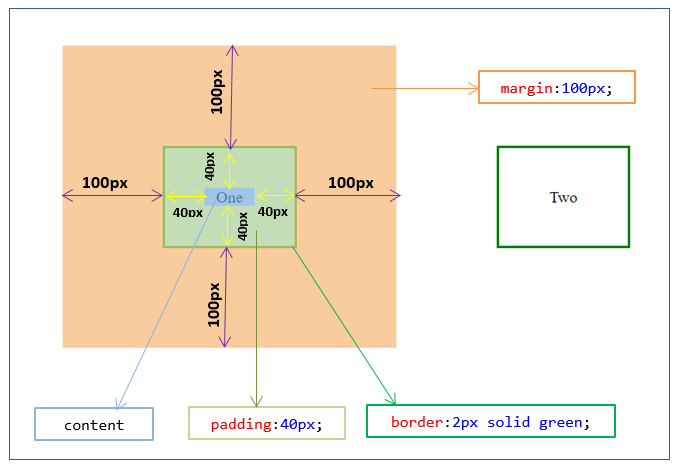
Example: Apply padding, border and margin to P element content.
<!DOCTYPE html/>
<html>
<head>
   <title>Box Model</title>
    <style>
        p {
            padding:40px;
            border:2px solid green;
            margin:100px;

            width:50px;
            float:left;
            text-align:center;
            }
    </style>
</head>
<body >
    <p>One</p>
    <p>Two</p>
</body>
</html>
Result:
In the above example,
- Two P elements are placed.
- For all the P elements, common CSS styles are applied
- For each P element, CSS properties padding, border and margins are applied.
-
In the first element (<p> One </p>),
- P element content is “One”.
- Around the content, padding is applied.
- Around the padding, border (green color) is applied.
- Around the border, margin is applied.
Using Chrome browser’s developer tool, one P element is explained.
Related topics:
In the above examples different CSS units are used. Please refer the following links to know better about CSS units.